Monday, August 28, 2023

Plum Focaccia


Plums and thyme make a delicious addition to focaccia, and while plums are in season, now is the time to try this recipe. The focaccia dough is easy to mix by hand with a wooden spoon, until you get a shaggy dough. Then it sits in the fridge overnight, or if you're in a hurry, on the counter. After it's risen, dump it into a rimmed cookie sheet and let the blob sit. If you try to stretch it out, it will fight you. But if you wait 15 minutes to a half hour, it will be a different story. Let it rise a second time in the pan, then using hands dipped in olive oil, make dimples all across the dough.

Spread with the plums, olive oil, salt and fresh thyme.

Bake in the oven till golden brown.


Don't forget to drizzle with honey.

The overnight rise contributes to a great flavor and texture.
This is the perfect accompaniment to drinks all by itself, but split in half, makes a terrific foil for some salami and cheese -- sweet and soft plums, salty salami and cheese, crunchy focaccia-- utterly delicious.

Plum Focaccia

Printable recipe here

Ingredients

  • 1 ¼-oz. envelope active dry yeast (about 2¼ tsp.)
  • 2 tsp. honey
  • 5 cups (625 g) all-purpose flour
  • 5 tsp. Diamond Crystal or 1 Tbsp. Morton kosher salt
  • 6 Tbsp. extra-virgin olive oil, divided, plus more for hands
  • 6-8 plums (I used Italian prune plums, but regular plums work fine too.)
  • olive oil to grease the pan
  • Flaky sea salt
  • fresh thyme
  • honey to drizzle
Instructions
  1. Whisk one ¼-oz. envelope active dry yeast (about 2¼ tsp.), 2 tsp. honey, and 2½ cups lukewarm water in a medium bowl and let sit 5 minutes (it should foam or at least get creamy; if it doesn’t your yeast is dead and you should start again—check the expiration date!).
  2. Start adding the flour and salt, but add only four cups flour at first and mix. Add more flour if needed. What you want is a shaggy dough with no dry streaks of flour.
  3. Pour 4 Tbsp. extra-virgin olive oil into a big bowl that will fit in your refrigerator.
  4. Transfer dough to bowl and turn to coat in oil.
  5. Cover with a silicone lid or plastic wrap and chill until dough is doubled in size (it should look very bubbly and alive), at least 8 hours and up to 1 day.
  6. If you’re in a rush, you can also let it rise at room temperature until doubled in size, 3–4 hours.
  7. After the dough has risen double in size, use a silicone spatula, gather up edges of dough farthest from you and lift up and over into center of bowl.
  8. Give the bowl a quarter turn and repeat process.
  9. You want to deflate dough while you form it into a rough ball.
  10. Generously oil a 13×9″ baking pan, for thicker focaccia that’s perfect for sandwiches, or an 18×13″ rimmed baking sheet, for focaccia that’s thinner, crispier, and great for snacking.
  11. Dump the dough to the center of the prepared pan.
  12. If you try to stretch it out right away to the corners of the pan, it will be difficult.
  13. Wait fifteen minutes to a half hour, then stretch out the dough. It will be much easier.
  14. Pour any oil left from the bowl onto the dough.
  15. Let rise a second time, uncovered in the baking sheet, in a dry, warm spot (like near a radiator or on top of the fridge or a preheating oven) until doubled in size, at least 1½ hours and up to 4 hours.
  16. Place a rack in middle of oven; preheat to 450°.
  17. To see if the dough is ready, poke it with your finger. It should spring back slowly, leaving a small visible indentation.
  18. If it springs back quickly, the dough isn’t ready. (If at this point the dough is ready to bake but you aren’t, you can chill it up to 1 hour.)
  19. Lightly oil your hands. If using a rimmed baking sheet, gently stretch out dough to fill.
  20. Dimple focaccia all over with your fingers, creating very deep depressions in the dough (reach your fingers all the way to the bottom of the pan).
  21. Place cut plums on the focaccia, pushing them down into the dough,
  22. Drizzle with 1 Tbsp. extra-virgin olive oil and sprinkle with flaky sea salt and thyme.
  23. Bake focaccia until puffed and golden brown all over, 20–30 minutes.
  24. Drizzle with more olive oil and additional salt if needed.
  25. Focaccia is best eaten the day it’s made, but keeps well in the freezer.
  26. Slice it into pieces, store it in a freezer-safe container, then reheat it on a baking sheet in a 300° F oven.

Sunday, August 20, 2023

Caprese Salad Pasta


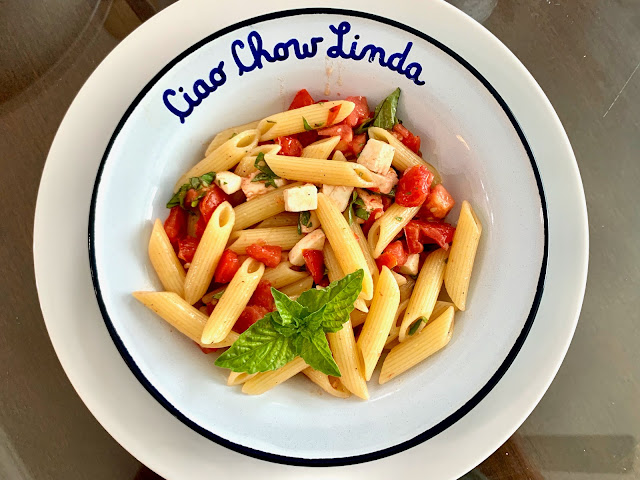
If you're like me, and can't get enough of garden fresh tomatoes, this recipe is for you. It's tastes like summer on a plate -- like a caprese salad, but with pasta. This is a recipe for those hot days when you don't feel like eating anything with a heavy sauce, but still want your pasta. The only cooking involved is in boiling the pasta. The sauce is made from raw tomatoes that are marinated with salt, pepper, garlic, basil  and olive oil. While the tomatoes are marinating, you can start boiling the pasta. Make sure you have the mozzarella cubed and ready to go when the pasta is boiling.

Place the hot, drained pasta in the bowl with the tomato mixture and add the mozzarella. Toss everything together and the mozzarella will start to soften and slightly melt. It doesn't get much easier than this -- or tastier. Don't try this with supermarket tomatoes. You must use tomatoes perfectly ripe from the garden. I'm not sure why, but our tomatoes from the garden this year have been abundant, more flavorful and juicier than ever -- just perfect for this dish of caprese salad pasta.
Click here to connect with me on Instagram and find out what’s cooking in Ciao Chow Linda’s kitchen each day (and more)


Caprese Salad Pasta

2 cups garden fresh tomatoes, cut into small pieces (I removed the seeds from some of the tomatoes)
1/2 cup olive oil
ample salt, pepper to taste
1 small clove garlic, minced
a good amount of basil, minced
1 cup fresh mozzarella cheese, cubed and at room temperature
1/2 lb. ziti or other pasta
parmesan cheese, optional

Cut the tomatoes into small pieces and place them in a bowl to marinate for at least 15 minutes with the olive oil, salt, pepper and basil.
Boil the pasta and drain, then add to the bowl with the tomatoes and quickly add the mozzarella cheese, mixing everything well. 
Serve immediately. 
Sprinkle with parmesan cheese (optional).

Saturday, August 12, 2023

Gratinéed Peppers, And a Blogiversary Giveawaay

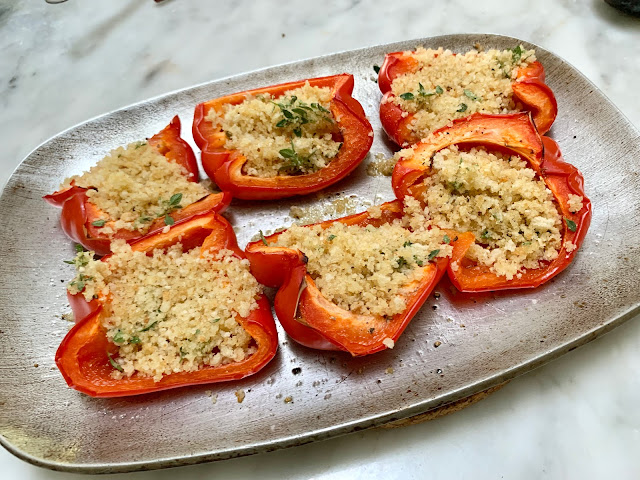
In this summer of bounteous corn, peaches and tomatoes here in the Garden State (that would be New Jersey, of course), let's not forget about peppers. Red peppers are starting to come in strong, and if you grow peppers, you know that if you leave them on the plant longer, they'll turn from green to red -- that's when they're sweetest and so delicious to eat in so many ways. One of my favorites is this gratinéed recipe. Just take out the core and inner white ribs, then cut the peppers in thirds -- quarter them if they're large. 
Mix the bread crumbs, parmesan cheese, olive oil and seasonings. Cook the peppers without the gratinéed mixture first for half an hour, then remove from the oven and fill with the bread crumb mixture.
Place the pan back in the oven for another 15 minutes, or until the crumbs start to turn golden. 
These are delicious as a side dish, or even as a first course. 
Now for the giveaway and the reason -- I'm celebrating 15 years of blogging!! Woohoo! It's hard to believe I've been at this so long, but initially I started it as a way to archive family recipes. But it's become a whole lot more through the years. Yes, most of the recipes are Italian-influenced, but there are plenty of other recipes too. And through the blog, I've made friends from across the U.S. and the world -- a real bonus. Though I don't post as frequently as I used to (life has a way of interfering), I'm planning to get back to posting once every week or so when the summer fun with family and friends tapers off.
You'll be more likely to see what I'm up to on a daily basis on my Instagram account, where it's so quick and easy to post.
I sometimes wonder whether anybody still reads my blog on a regular basis. Are we food bloggers relevant any more, now that so many other platforms have emerged? 
In any event, I thought I'd gift one faithful reader with a thank you for staying with me through the years. Some of you know I like to paint, and I've been focusing more on watercolors this summer. I haven't had a chance to get back to my oil painting in the last couple of months with so much travel and visitors taking priority.
But I painted a series of peppers a while ago, and I'm happy to part with this 8" x 8" framed, original oil painting of a red pepper, to one of you.
All you have to do is subscribe to my blog (if you haven't already - it's easy - just enter your email address in the "subscribe" box. ) Then leave a comment on the blog with an email address for me to contact you if you're chosen. (by the random computer-generated method). Follow Ciao Chow Linda on Instagram too (click here) for an extra chance to win. And for three chances to win, follow my art page on Instagram here. Buona fortuna.

Click here to connect with me on Instagram and find out what’s cooking in Ciao Chow Linda’s kitchen each day (and more)

Gratinéed Red Peppers


Ingredients
3 medium size red peppers
1/4 cup bread crumbs
3 tablespoons parmesan cheese
4 tablespoons olive oil
salt, pepper to taste

Directions
Core the peppers and remove the white ribs.
Cut the peppers into thirds (or quarters if large) and place on a pan smeared with olive oil.
Drizzle a little olive oil over the peppers, then sprinkle with salt and pepper.
Bake the peppers at 375 degrees for 1/2 hour.
Meanwhile, prepare the filling by mixing together the bread crumbs, parmesan cheese, olive oil, salt, pepper and thyme.
Divide the filling among the peppers and bake for another 15 minutes or until lightly browned.